
A program puts a 90° spot drill ahead of a 140° solid carbide drill, or someone starts the hole with a center drill because one was already in the tool magazine. The first parts come off clean. Then, partway through the batch, the outer corners of the carbide point begin to chip and the hole entry position starts to drift. The carbide grade usually gets the blame. The cause sits one tool earlier, in the cone angle the starter leaves behind.
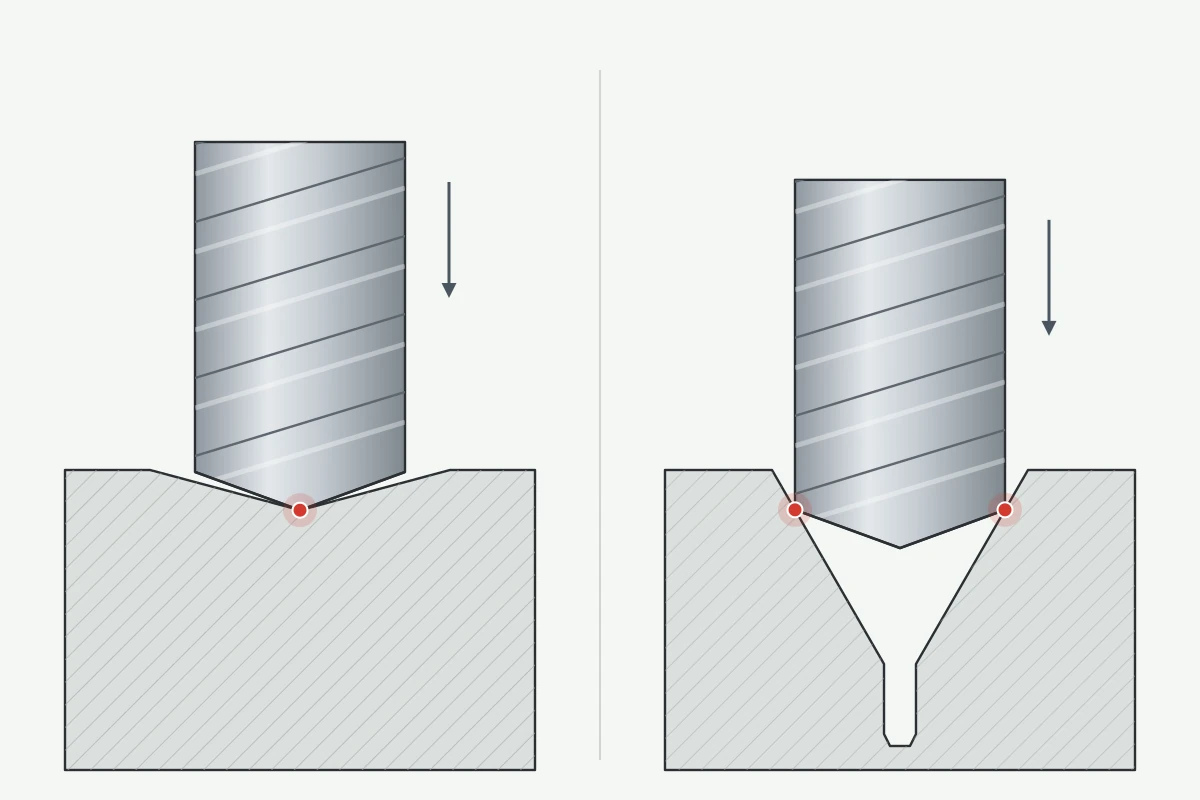
Use a spot drill to locate a drill and a center drill to cut a 60° center hole for a lathe center. Before a carbide drill, set the spot angle equal to the drill point or slightly wider, so the point center touches first and the corners stay off the cone. On a flat, square face, many self-centering carbide drills need no spot.
Whether a hole needs a pilot at all is decided in when to pilot drill before a carbide drill, and diagnosing a bad entry is handled in carbide drill pilot holes and entry control. What follows starts from a program that already calls a separate starter tool.
What Each Tool Is For
A spot drill is a short, stiff tool with a single cone at the tip. Its one job is to cut a shallow cone at the programmed position so the next drill starts exactly there. With a short body and no slender pilot, it deflects little and holds position on a machining center.
A center drill is a combined tool. A small pilot drill sits in front of a 60° countersink, and together they cut a center hole that a tailstock center or a grinding center can ride in. The pilot is slender because it only has to make room for the tip of the center. That shape suits turning and grinding work held between centers. As a starter for a production drill, it puts the wrong cone in front of the drill.
| Spot drill | Center drill | |
|---|---|---|
| Main job | Locate the drill that follows | Cut a center hole for a lathe or grinding center |
| Tip form | One cone, no pilot | Small pilot drill plus a 60° cone |
| Usual machine | Machining center, ahead of a drill | Lathe or grinder, work held between centers |
| What it leaves | A shallow cone matched to the drill point | A 60° seat with a small hole at the bottom |
| Weak point | Wrong angle for the drill that follows | Slender pilot; cone far narrower than a drill point |
Spot Angle vs Drill Point: Center First, Corners Never
Drill point angles and spot angles are both included angles, so they compare directly. When the spot cone is narrower than the drill point, the drill cannot reach the bottom of the spot with its center. The outer corners, where the cutting lips meet the margins, touch the cone wall first. On a carbide drill those corners are the most fragile part of the point, and now they take the first load on a slope, usually one corner a moment before the other. That uneven first contact chips the corners and can push the drill off the spot.
A 90° spot ahead of a 140° drill is a common setup on machining centers. The 90° cone is far narrower than the 140° point, so the corners meet the cone wall well before the center reaches the bottom. A center drill is worse again, because its 60° cone is narrower still. If that 90° spot is only there to leave the hole-edge chamfer, cut the chamfer after the drill; countersink vs chamfer mill covers which tool to use for it.
When the spot angle equals the drill point, or is slightly wider, the chisel edge and the center of the point touch first. The drill centers itself in the spot, both lips start cutting together, and the corners enter the material only after the point is already located.
| Following carbide drill point | Spot angle to pair with it | What happens at entry |
|---|---|---|
| 118° | 118° spot or a 120°-class spot | Point center seats first; corners follow into solid material |
| 135° | 135° spot or a 140°-class spot | Point center seats first; the 140°-class spot keeps the corners a little further off the cone |
| 140° | 140°-class spot, or no spot on a flat, square face | Point center seats first; on a flat, square face the drill can usually start without a spot |
Choosing the drill point angle itself is a separate decision, made in carbide drill flutes and point angle selection. Once the point is fixed, the spot angle follows it.
Starter tools ground to suit the drill behind them are listed under carbide spot and center drills.
When a Carbide Drill Should Skip the Spot
Many solid carbide drills have a self-centering point, with a thinned web that shortens the chisel edge so the point locates on contact. On a flat face square to the spindle, with the drill held short and running true, these drills usually start directly and hold position. A spot in front of them adds a tool change and a second location that has to line up with the first. If the spot lands slightly off position or at the wrong angle, the drill follows that error into the part.
A spot still earns its place on inclined faces, curved faces and rough cast skin, and when the drill runs with long stickout. The entry-control guide linked near the top covers how to judge each of those entries. Where a spot goes in, the pairing table above still applies.
Center Drills on Lathes: Form A vs Form B
Center drills belong to work that is turned or ground between centers. Under DIN 333, a Form A center drill cuts a plain 60° center hole: a small straight hole at the bottom and a 60° cone that the lathe center seats in. Form B adds a 120° protecting cone at the mouth of the 60° cone. That outer cone sets the edge of the seat below the end face, so a knock to the shaft end is less likely to damage the surface the center runs on.
Form A is the usual pick when the center hole is used once and the end is faced or cut off later. Form B is the usual pick when the center hole stays on the finished part or has to be reused for regrinding, because its recessed seat is better protected during handling.
Neither form is a drill starter. Both leave a 60° seat with a small hole at the bottom, and a carbide drill entering that seat meets it with its corners first.
What to Send
Ask for the starter and the drill it serves in one quote. These fields decide the spot geometry:
- The following drill: diameter and point angle (118°, 135°, 140° or another angle).
- Workpiece material.
- Entry surface: flat, inclined, curved or rough cast.
- Machine: machining center or lathe, and whether the hole is a drill start or a center hole for turning or grinding.
- Whether you need a custom spot angle or spot diameter. XRZ can make both as part of a drill package.
The drill that runs after the spot is covered on the solid carbide drill page.
Frequently Asked Questions
Can I use a center drill to spot for a carbide drill?
It is a poor match. A center drill cuts a 60° cone, far narrower than a common drill point, so the outer corners of the carbide drill touch the cone wall before its center does. That puts the first load on the most fragile part of the point and can chip it or push the drill off position. The slender pilot on a center drill is also easy to break when it is used as a production starter. Use a spot drill matched to the drill point.
What spot angle should I use before a 140° carbide drill?
Use a 140°-class spot, or skip the spot when the face is flat and square to the spindle and the drill has a self-centering point. Avoid a 90° spot ahead of a 140° drill: the narrow cone makes the outer corners touch first and raises the risk of corner chipping.
Do solid carbide drills need a spot drill at all?
Often they do not. Many solid carbide drills are self-centering and start cleanly on a flat face square to the spindle. A spot is still worth using on inclined, curved or rough cast entries and with long stickout. When you do spot, make the spot angle equal to the drill point or slightly wider.
What is the difference between a Form A and Form B center drill?
Both cut a 60° center hole for a lathe or grinding center. Form A leaves the plain 60° seat. Form B adds a 120° protecting cone at the mouth, which sets the edge of the seat below the end face so it is less likely to be damaged by knocks during handling. Form B is the usual choice when the center hole stays on the part or is reused.
Send the drill point angle and the entry surface; we match the spot geometry to the drill.